Overview
This project demonstrates a simple rasterizer for svg files that creates images by drawing colored triangles, applies transformation to shapes, and applies textures to image files. Basic anti-aliasing methods - namely super-sampling, pixel sampling for texture mapping, and level sampling with mipmaps for texture mapping, are also implemented. I found that very noticeable differences in image quality can be achieved with fairly simple math and algorithms. Each anti-aliasing method has its tradeoffs, so it makes sense that all of them exist and are often used in some combination with one another to achieve optimal results.
Section I: Rasterization
Part 1: Rasterizing single-color triangles
I have a helper function, inside_triangle, that returns 1 if a sampled point is inside or along the border of a triangle defined by 3 points and 0 otherwise. To do this, I base inside_triangle on the three line test described in lecture 2. inside_triangle checks that L0, L1, and L2 are either all >= 0 or all <= 0 (this allows the points of the triangle to be given in any arbitrary order).
To make sure that the algorithm only checks each sample within the bounding box of the triangle, I limit the pixels to check and render to (min_x, min_y, max_x, and max_y), where min_x and min_y = the minimum of all x and y coordinates (respectively) of the triangle, and max_x and max_y = the maximum of all x and y coordinates (respectively) of the triangle. I round the bounding box coordinates down (floor) to the nearest integer, since rounding up (ceiling) would result in checking an extra row or column that would certainly not be in the triangle (e.g. since ceil(max_x) > max_x, ceil(max_x) + 0.5 is also max_x and thus cannot be inside the triangle).
Below is a png screenshot of basic/test4.svg with the default viewing parameters and with the pixel inspector centered on an the corner of the pink polygon to highlight the jaggies that result from sampling with a sample rate of 1.

|
Part 2: Antialiasing triangles
To implement supersampling, I use the data structures outlined in the assignment. Namely, as the sample rate or frame buffer size is changed (or when the frame buffer needs to be cleared), supersample_buffer is updated to be a white-filled array of size width * height * (sample rate). The function rasterize_triangle is updated such that instead of sampling once in the center of each pixel, N evenly-spaced samples are taken per pixel in an sqrt(N) x sqrt(N) array (where N = sample rate). That is, the first sample in the pixel is at (1/(2*sqrt(N)), 1/(2*sqrt(N))), and the samples are spaced by 1/sqrt(N) from each other in either the x or y direction. supersample_buffer is updated to store the color of each supersample based on the same inside_triangle function, called upon each supersample location, from Task 1. Finally, the function resolve_to_framebuffer is called; and in this function, downsampling occurs. For each pixel, the red, green, and blue values of the supersamples within that pixel (stored in supersample_buffer) are separately summed and then averaged, and the regular rgb_framebuffer_target is updated with these average red, green, and blue values for the given pixel.
To properly rasterize lines and points, the fill_pixel function is updated to fill all supersample_buffer values of the pixels corresponding to lines and points with the given color.
Supersampling is useful as a simple-to-implement (though potentially costly) antialiasing algorithm that can mitigate "jaggies" that result from undersampling high-frequency features.
Below are screenshots of basic/test4.svg with the default viewing parameters and sample rates 1, 4, and 16. The pixel inspector is positioned over a skinny triangle corner.

|

|

|
Without supersampling, we see the skinny triangle corner (read: high-frequency feature) as a discontinuous feature due to undersampling. As we increasing our sampling rate, this corner appears more continuous and corner-like. This is because increasing the sampling rate increases the Nyquist frequency ( = half the sampling frequency). Aliasing disappears as the Nyquist frequency approaches twice that of the highest frequency component of the image.
Part 3: Transforms
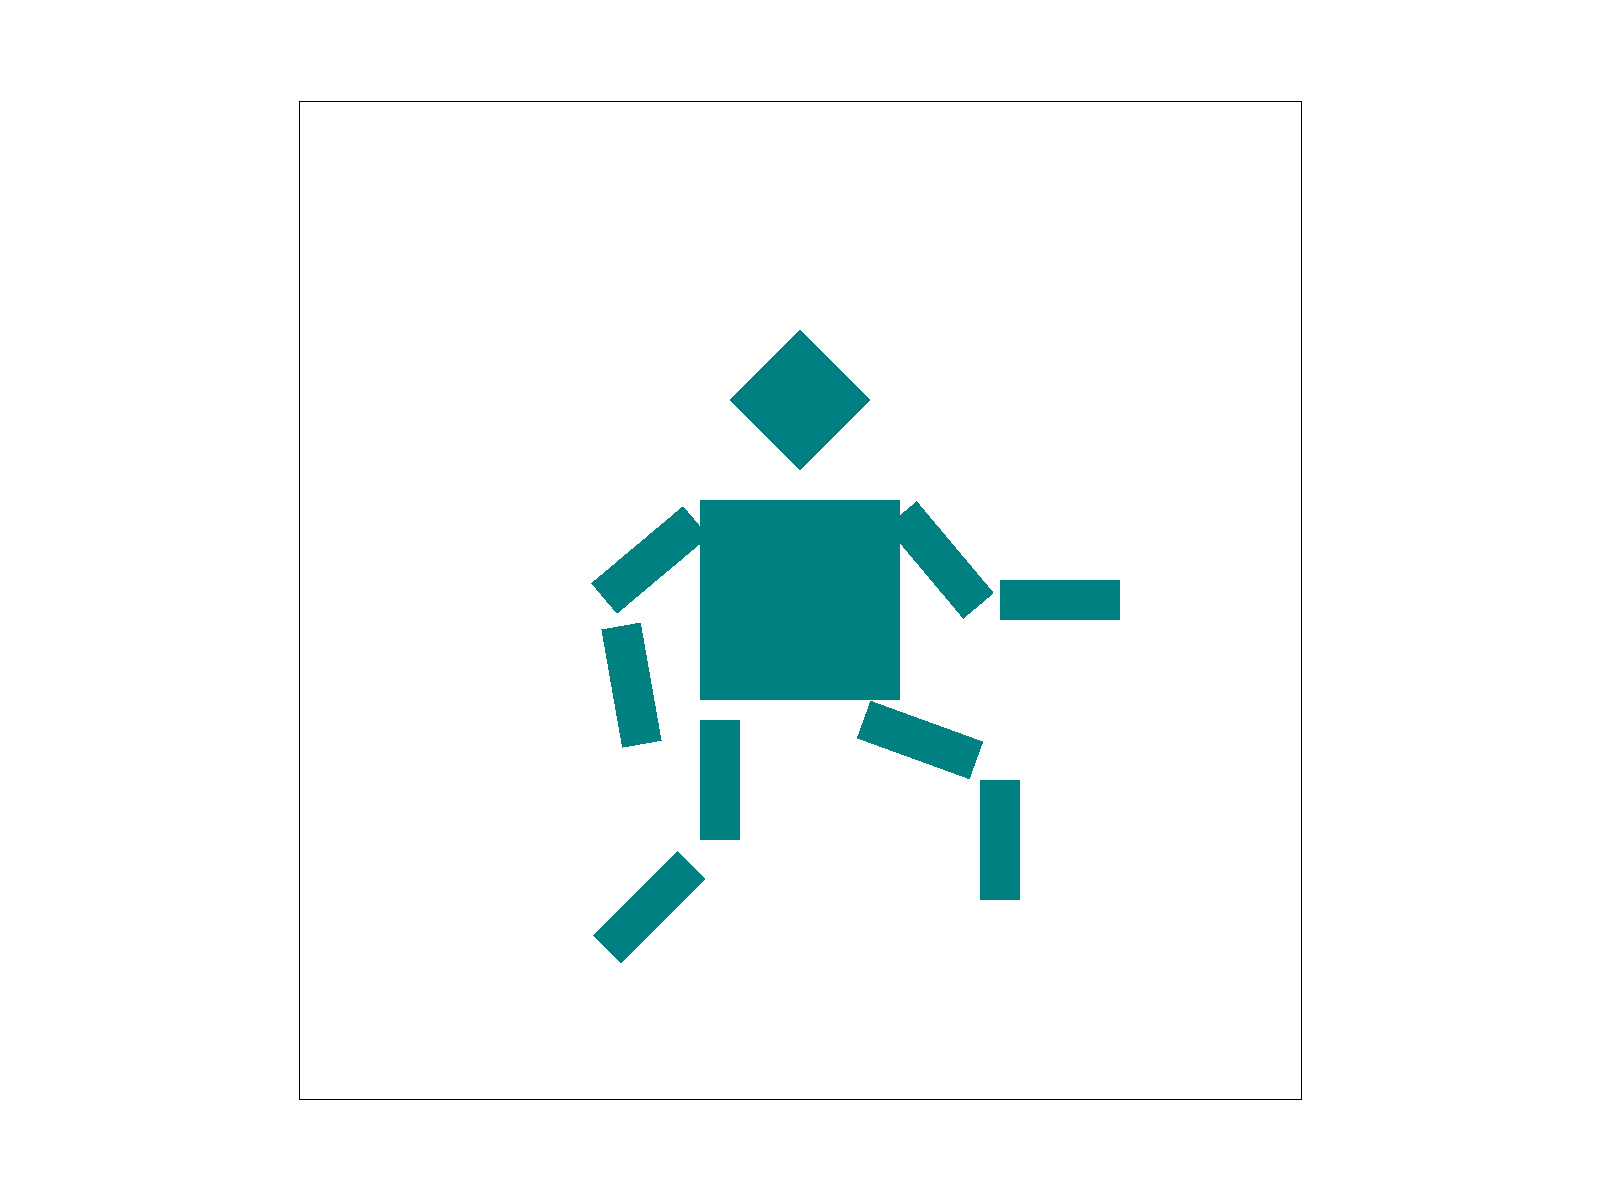
Below is a screenshot of the rendered drawing of my_robot.svg. I was trying to make a teal-colored, awkwardly-running cubeman. I did this by rotating and re-translating the cubeman's leg and arm components and then recoloring all the polygons.
|
Section II: Sampling
Part 4: Barycentric coordinates
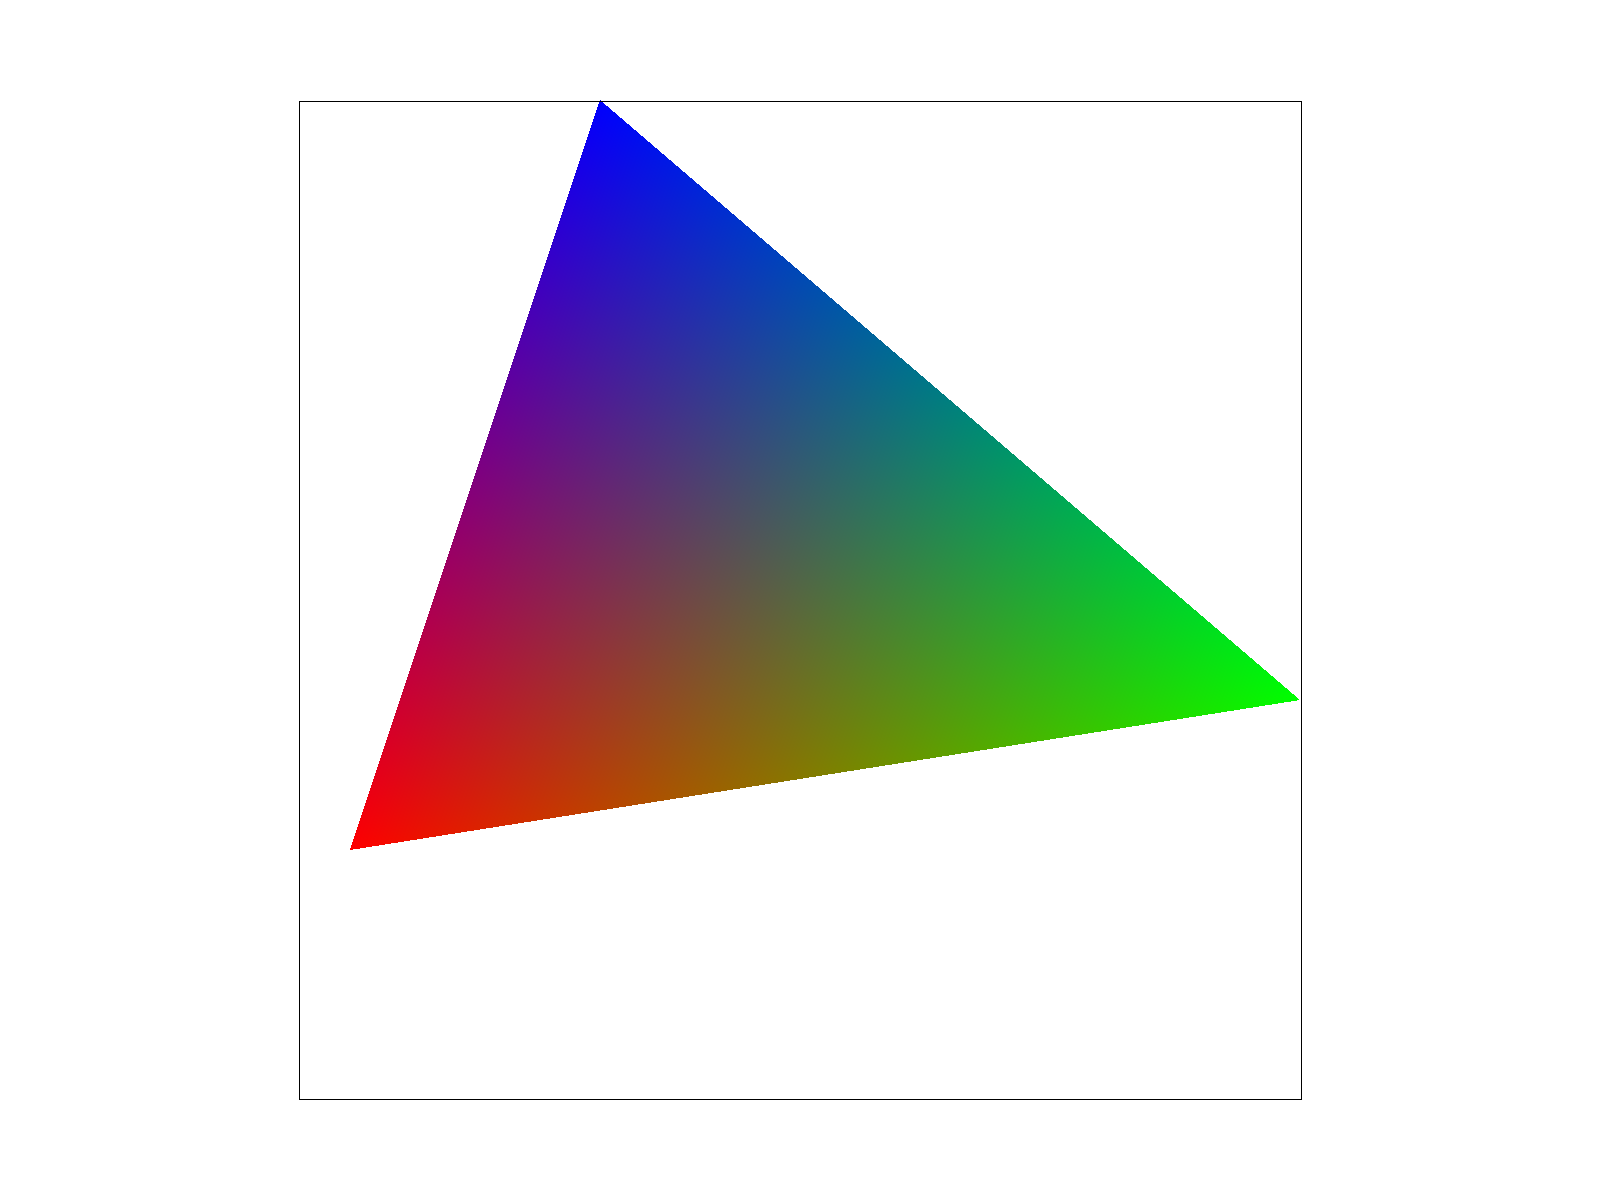
The Barycentric coordinates for a given point are a set of that point's normalized (add up to 1) inverse distances from each of a triangle's vertices. They express a point's weight within a triangle with respect to the coordinates of that triangle as interpolated linearly (akin to a weighted center of mass). When a triangle is rasterized using Barycentric interpolation, each vertex of the triangle will be filled by the pure color defined at that vertex; as the rasterizer encounters pixels more away from one vertex and nearer the other 2, more and more of the colors of the other 2 vertices will be blended (via a linear gradient) to determine the color of that pixel. The point in the center of the triangle that is equidistant from the 3 vertices will be an equal mix of the colors of the 3 vertices. A single triangle with one red, one green, and one blue vertex would appear as below:
|
Below is a screenshot of svg/basic/test7.svg with default viewing parameters and sample rate 1.
|
Part 5: "Pixel sampling" for texture mapping
Pixel sampling is a method of texture mapping whereby the texture that corresponds to a given screen pixel is determined by sampling texture values from the pixels of a texture file ("texels") within a fixed mipmap (or texture resolution). The nearest pixel sampling method simply rounds a point in texture space that corresponds to a point of interest in screen space to the nearest texture sample location (i.e. its coordinates are rounded to the nearest integer). The bilinear sampling method considers the 4 texture samples that are closest to the desired point in texture space and linearly interpolates the texture values (either first in x then in y or first in y then in x) to determine the texture to assign the point. Implementation-wise, this is done by calculating the (u,v) that corresponds to the barycentric coordinates of each pixel within a triangle in rasterize_textured_triangle in rasterizer.cpp. The (u,v) coordinate is then passed to either texture.cpp's sample_nearest or sample_bilinear function, depending on the selected psm. In sample_nearest, the (u,v) coordinates are normalized by the width and height (technically width-1 and height-1 because of pixel indexing from 0) of the 0th texture mipmap (this becomes the width/height of the nth mipmap in Part 6), and MipLevel's get_texel function is used to find the color to assign the pixel. In sample_bilinear, this process is done for all 4 texels nearest to the given (u,v). A horizontal lerp, a vertical lerp, and a lerp between the two are performed on the 4 colors to calculate the ultimate color for the pixel.
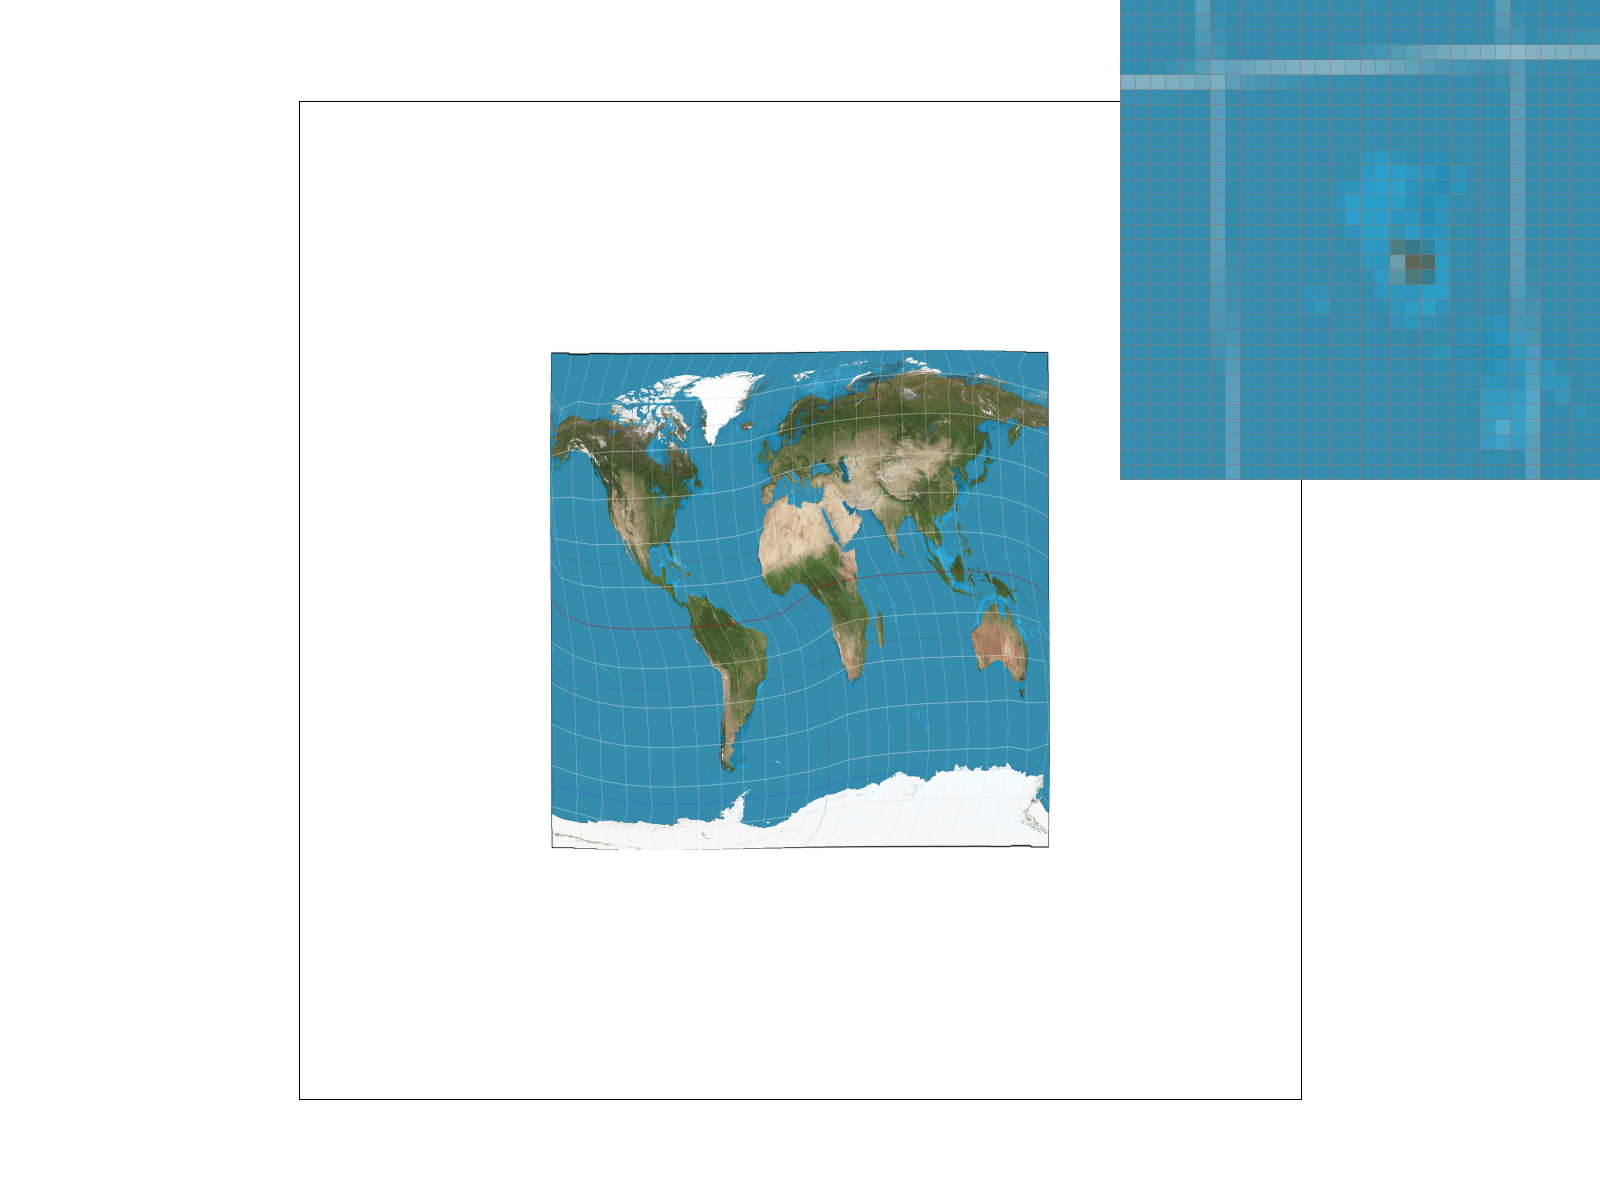
Below are 4 screenshots of svg/tex/map/test1.svg showing the differences of nearest sampling at 1 sample per pixel, nearest sampling at 16 samples per pixel, bilinear sampling at 1 sample per pixel, and bilinear sampling at 16 samples per pixel.

|

|

|
|
Without supersampling, bilinear sampling defeats nearest-neighbor sampling in the above example. Nearest-neighbor sampling at 1 sample/pixel shows discontinuous edges and jaggies for high-frequency features, such as the latitude/longitude lines on the images above, due to under-sampling. Bilinear sampling is essentially applying a blur (or supersampling), so some degree of antialiasing is achieved, and features such as the latitude/longitude lines appear more continuous and smooth. In general, there will be the biggest difference between these two sampling methods at edges that change quickly on a pixel-by-pixel level (high-frequency image components), because such features are the ones that will be undersampled by nearest-neighbor sampling but may potentially be sufficiently sampled by bilinear sampling. Supersampling at 16 samples/pixel has its own antialiasing effect with a higher Nyquist frequency. Thus, there is no visual advantage of bilinear sampling at this supersampling frequency. The trade-off is that supersampling at 16 samples/pixel is much more computationally expensive and slower.
Part 6: "Level sampling" with mipmaps for texture mapping
Level sampling is another form of anti-aliasing for textured images that relies on sampling "mipmap levels" instead of sampling a collection of pixels in the original image. Mipmap levels are a series of downsampled versions of a texture that decrease in resolution as the level increases. The general idea is that for "minified" areas of a textured image (where the risk of under-sampling is particularly high), a higher mipmap level is used for sampling, which results in a filtered, anti-aliased texture. Mathematically and implementation-wise, as described in the assignment description and lecture slides, this is accomplished by first computing the barycentric coordinates of a point (x,y) and its adjacent coordinates (x+1,y) and (x,y+1) in the rasterize_textured_triangle function in rasterizer.cpp. As before, it is checked that all points are indeed inside the triangle of interest and inside the image bounds. Next, the texel (u,v) coordinates of each are calculated, and a SampleParams structure is populated and passed to texture.cpp's sample function. There, a call to the helper get_level function is made. The partial derivatives du/dx, dv/dx, du/dy, and dv/dy are calculated. Since u and v are a number in [0, 1], these partial derivatives are normalized by the width (in the case of partial u derivatives) or height (in the case of partial v derivatives) of the texture. Finally, the formula from Lecture 5 is used to calculate the appropriate mipmap level. Bounds are placed such that the level that is passed on is between 0 and kMaxMipLevels - 1. The level is rounded to the nearest integer for lsm=L_LINEAR sampling, left untouched for lsm=L_LINEAR sampling, and assigned as 0 for lsm=L_ZERO. Back in the sample function, sample_nearest or sample_bilinear (depending on the selected pixel sampling method) is called on the floor and ceiling of the level (these will only be different in the case of lsm=L_LINEAR), and a lerp is performed to find the final color for the pixel (again, this lerp is technically only necessary for the lsm=L_LINEAR case).
Level sampling with mipmaps is generally faster to achieve "acceptable" anti-aliasing than pixel sampling and supersampling are (as seen in the examples at the bottom of this section) because fewer expensive memory accesses are required. Level-sampling requires extra memory in comparison to pixel sampling, though in practice this tradeoff is usually acceptable. The memory overhead of storing the entire mipmap is 4⁄3x (each mipmap level is one-fourth the size of the previous one, so the total overhead is the geometric sum of 1 + 1⁄4 + 1⁄16 + ... + 1⁄4n), where x is the size of the original texture.
Level sampling is the clear "winner" in terms of anti-aliasing power when the image is zoomed out. This is when features in an image are at the highest risk of being undersampled. Without anti-aliasing, moiré is one such artifact that might result. One downside in terms of quality is that there is usually blurring in the foreground or magnified areas (though oftentimes this is better than moiré in the background, especially in videos/dynamic situations). In very zoomed in areas, level sampling's anti-aliasing power is much more slight (partially because there simply isn't as much aliasing that level sampling can fix) or potentially worse (overblurring potential) than bi-linear pixel sampling or supersampling. Supersampling "power"-wise is very effective, though it becomes unrealistically slow and is thus not as frequently used, especially for large images.
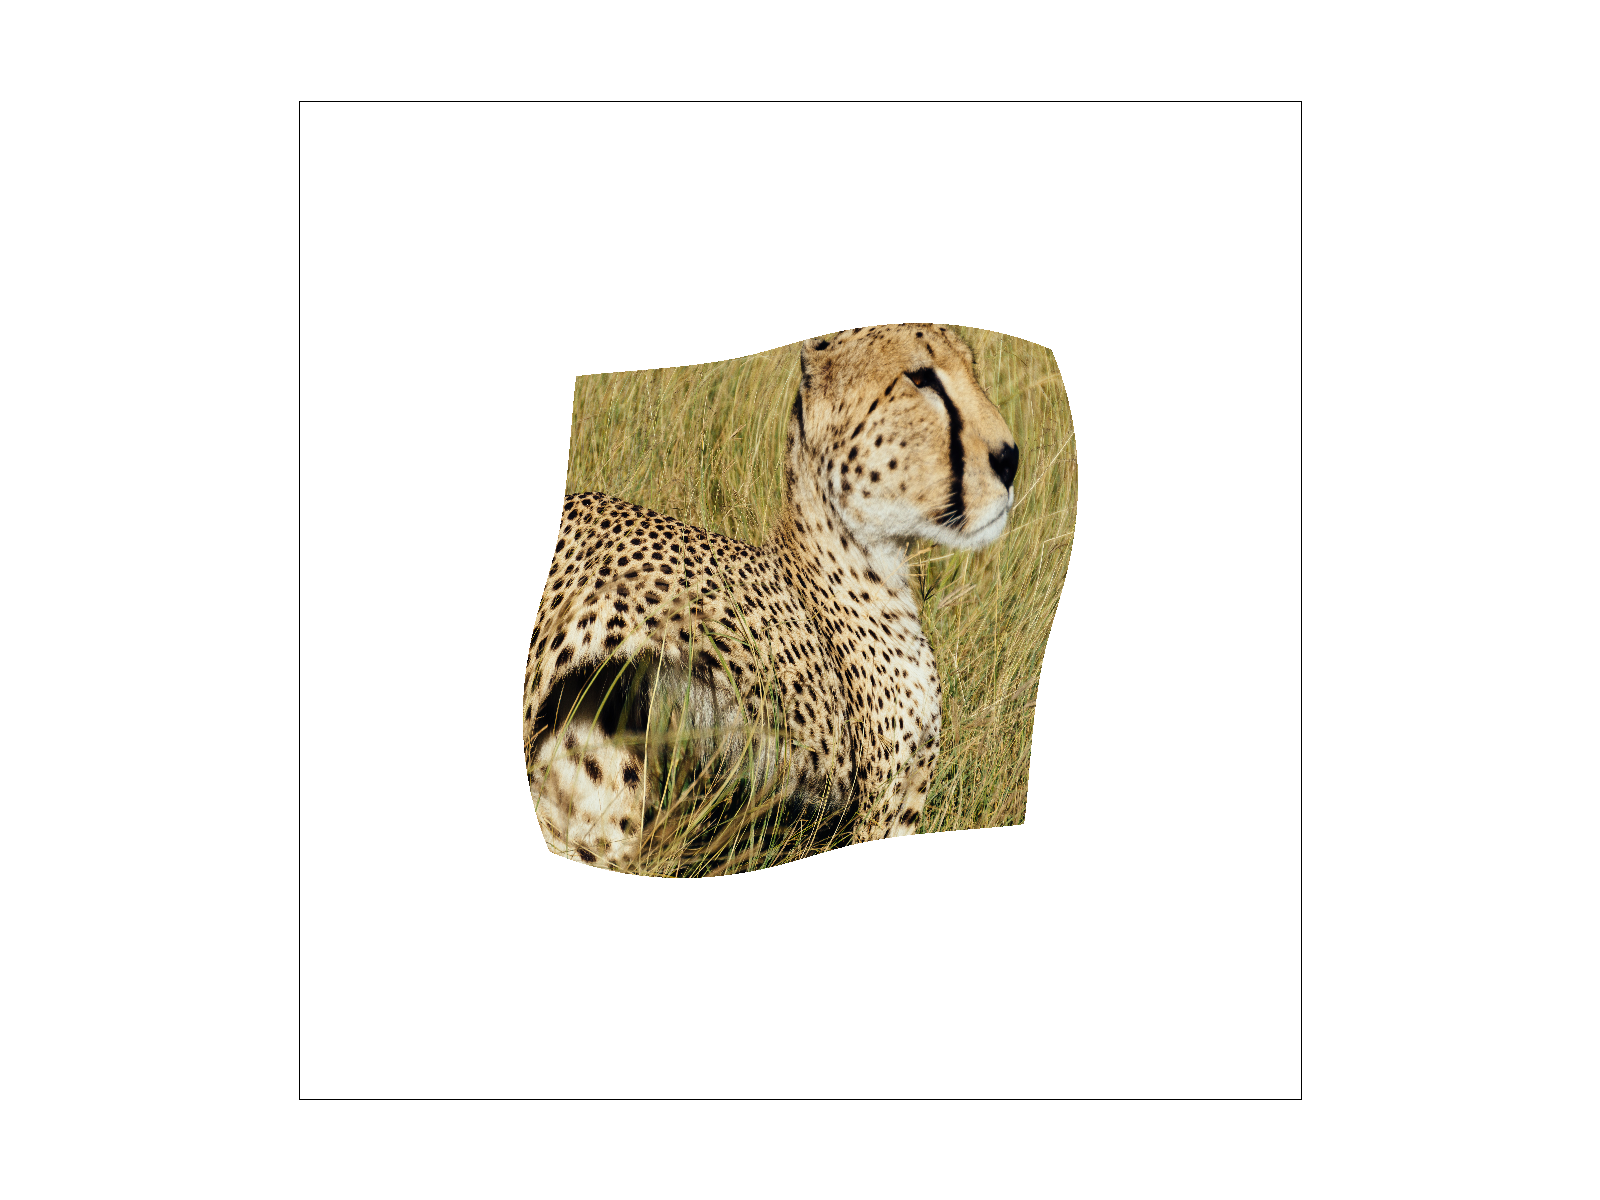
Below are screenshots showing combinations of zero-level or nearest-level sampling with nearest-neighbor or bilinear pixel sampling applied to a picture of a cheetah with the texture of test6.svg in the texmap folder.

|
|

|

|